MongoDB on AWS EC2 - Step-by-Step Guide
A beginner-friendly guide to setting up MongoDB on an AWS EC2 instance.
MongoDB is a widely used NoSQL database known for its flexibility, scalability, and ease of use. This guide is designed for beginners looking to set up their own MongoDB database on an AWS EC2 instance in simple and clear steps.
- MongoDB Compass (Free Software)
- PuTTY (For SSH Connection)
- AWS Account
Amazon Elastic Compute Cloud (EC2) is a cloud-based service that provides resizable computing power, allowing users to deploy and manage virtual machines easily. It is widely used for hosting applications, running development environments, and managing databases. In this guide, we will set up an EC2 instance running Ubuntu 22.04 LTS. Ubuntu is a popular choice for cloud servers due to its stability, security, and strong community support. Specifically, for MongoDB, Ubuntu provides official repositories, making installation and maintenance straightforward. Additionally, its compatibility with modern cloud environments ensures optimal performance and security updates.
Let's proceed with launching our EC2 instance and configuring it for MongoDB deployment.
Steps:
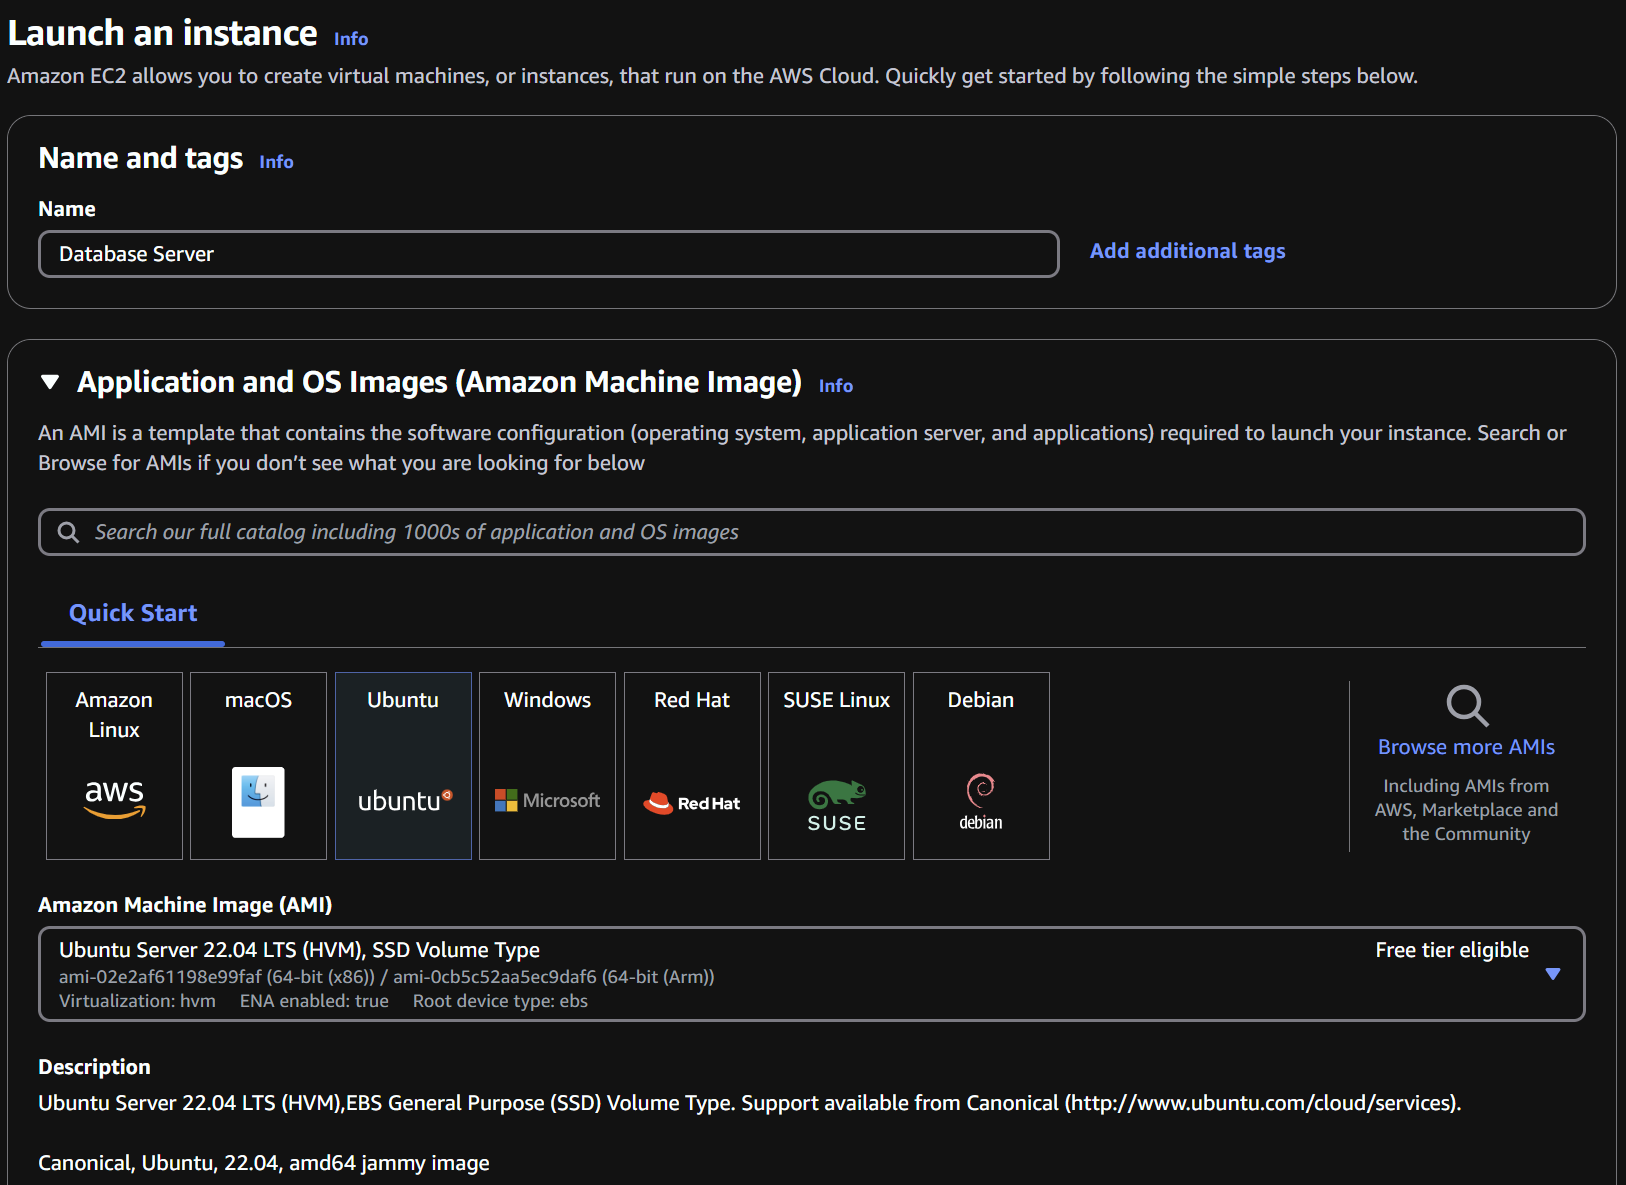
- Log into AWS and go to the EC2 dashboard.
- Click on Launch Instances.
- Choose a name and select Ubuntu 22.04 LTS (Free Tier Eligible).
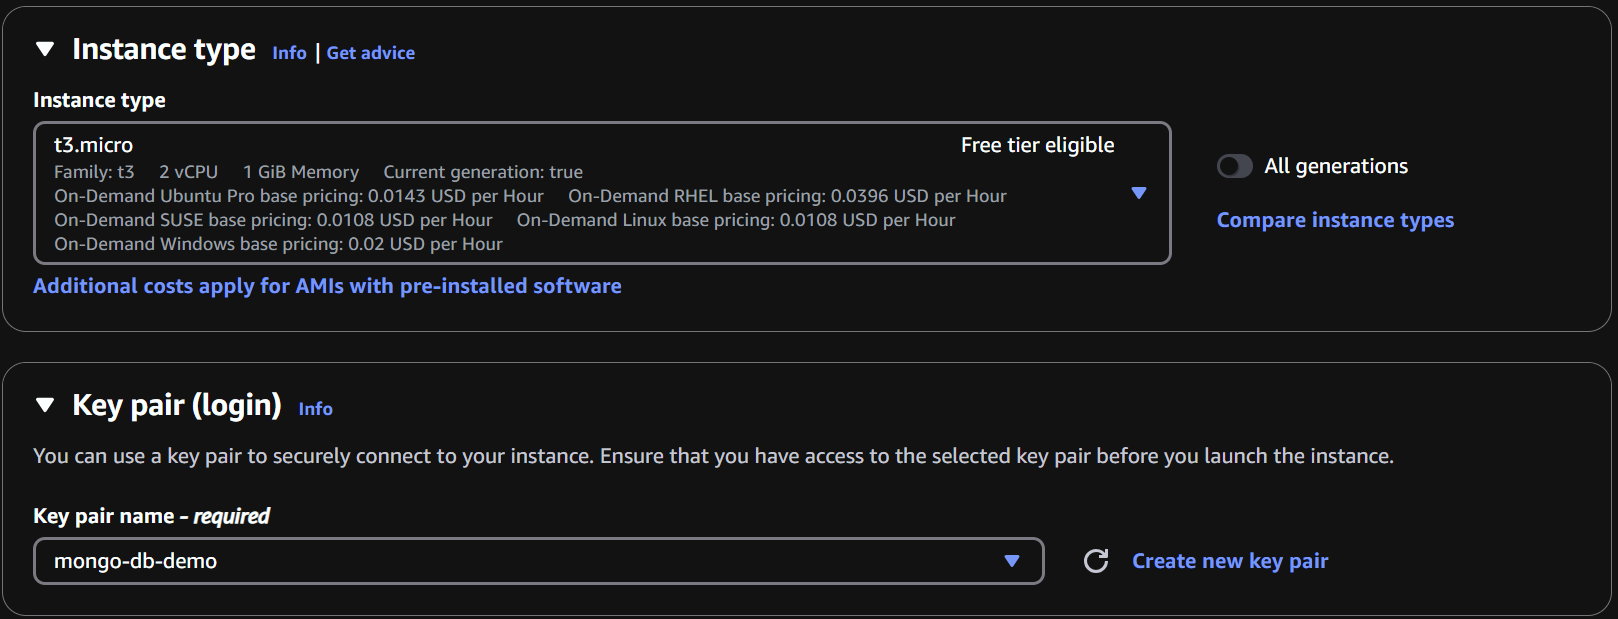
- Select t3.micro as the instance type.
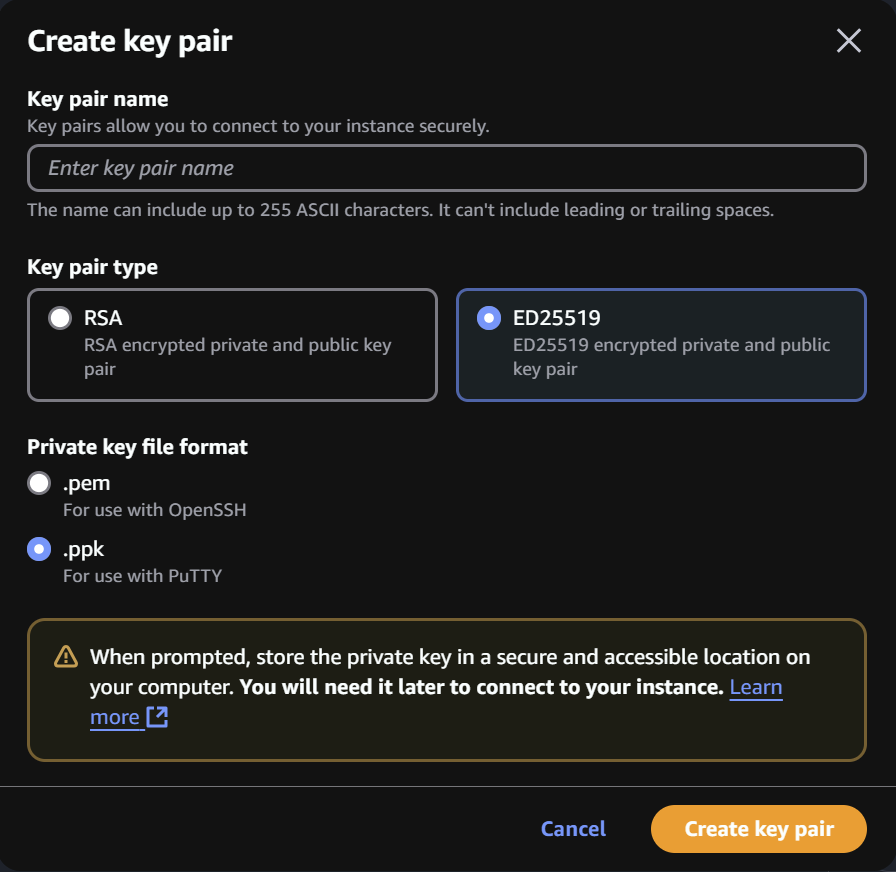
- Create a new key pair (use ED25519 for better security).
- The public key is stored on the EC2 instance.
- The private key remains on your local machine and is required for authentication.
- It provides stronger security with a shorter key length.
- It is faster in key generation and authentication.
- It offers better resistance to brute-force attacks.
- Choose .ppk format for PuTTY.
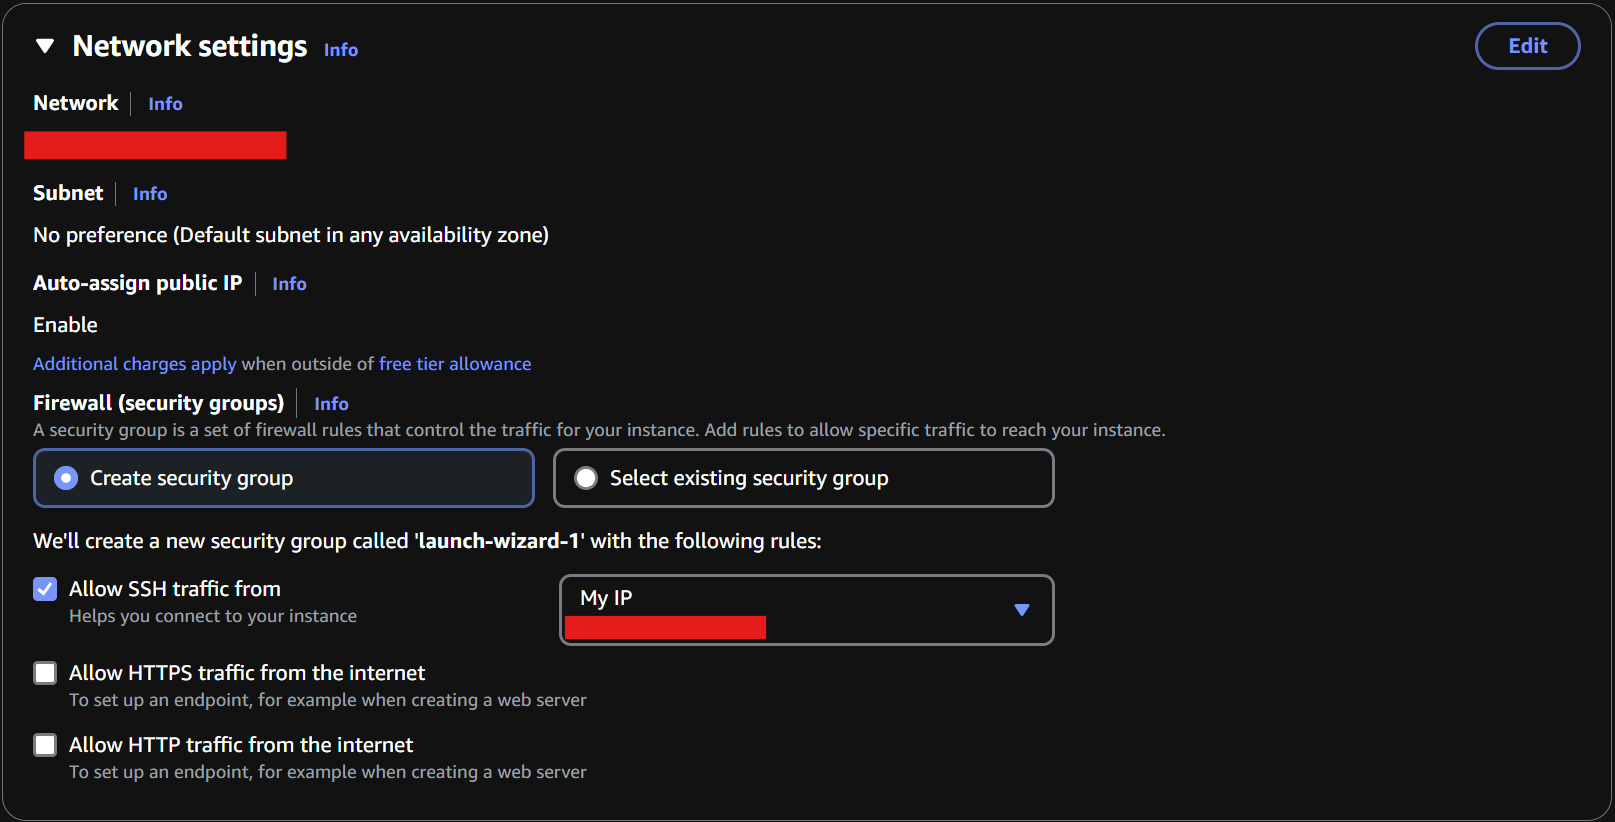
- Allow SSH access from your public IP.
- Creating stricter security group rules to limit access.
- Modifying the MongoDB configuration file to restrict database connections to specific IPs.
- Launch the instance and wait for status to show checks passed - your instance is now ready for MonogDB installation.
For security reasons, configure SSH access to allow connections only from your public IP address.
0.0.0.0/0).
This helps prevent unauthorized access and significantly reduces the risk of brute-force attacks.
If SSH access is open to all, anyone on the internet can attempt to connect, making your instance vulnerable to security threats. Restricting access to your **specific public IP** ensures that only you (or trusted users) can connect.
Later, in security groups, we can add additional rules if needed to allow access from other trusted sources. However, always consider security best practices, such as:
To securely connect to your EC2 instance, we use PuTTY, a popular SSH client for Windows that allows secure remote access to Linux servers.
Follow these steps to establish an SSH connection:
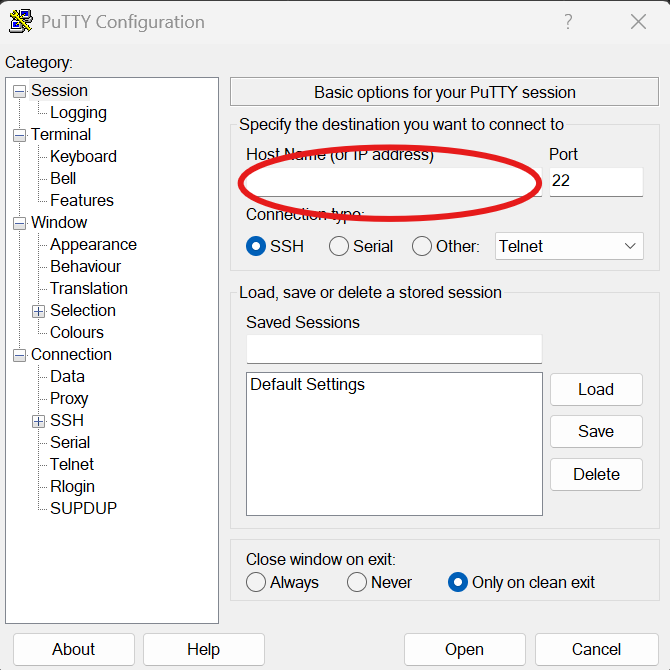
- Open PuTTY.
-
Enter the Public IPv4 of your EC2 instance.
Each EC2 instance is assigned a unique public IP address, which is required to connect to it over the internet.
Where to find it? In the AWS EC2 dashboard, select your instance and check the "Public IPv4 Address" field. -
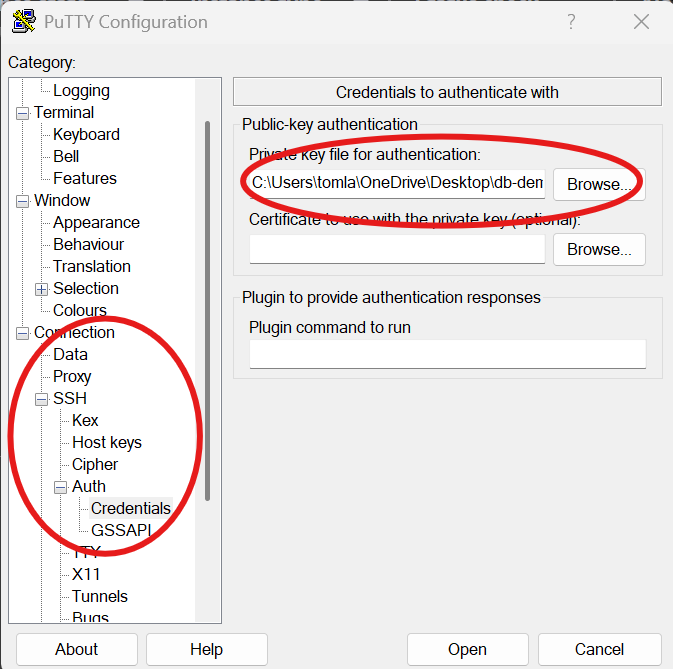
Go to Connection → SSH → Auth → Credentials and add your .ppk private key.
AWS uses public-key authentication, meaning you must use the private key (.ppk file) that corresponds to the public key associated with your instance.
Why this step? Without this, PuTTY cannot authenticate you, and the SSH connection will fail. -
Click Open.
This initiates the SSH connection to your EC2 instance. If all settings are correct, a terminal window will appear. -
When prompted, type ubuntu as the login username.
The default username for an Ubuntu-based EC2 instance isubuntu. This grants you access to the server with SSH privileges.
Note: If you’re using a different Linux distribution (e.g., Amazon Linux), the default username may be different (e.g.,ec2-user).
Installation Steps:
Copy and pase the following commands into the PuTTY terminal (make sure you are connected to the EC2 instance).
-
Update the system - this ensures that the system is up to date before installing new software.
sudo apt update && sudo apt upgrade -y
-
Import the MongoDB GPG key - required to verify MongoDB packages before installation.
curl -fsSL https://pgp.mongodb.com/server-7.0.asc | sudo gpg --dearmor -o /usr/share/keyrings/mongodb-server-7.0.gpg
-
Add the official MongoDB repository - ensures that MongoDB packages are fetched from the official source.
echo "deb [signed-by=/usr/share/keyrings/mongodb-server-7.0.gpg] https://repo.mongodb.org/apt/ubuntu jammy/mongodb-org/7.0 multiverse" | sudo tee /etc/apt/sources.list.d/mongodb-org-7.0.list
-
Install MongoDB - downloads and installs the MongoDB package.
sudo apt update && sudo apt install -y mongodb-org
-
Enable and start the MongoDB service:
sudo systemctl enable mongod && sudo systemctl start mongod
-
Edit the MongoDB configuration file - launches the text editor to modify the configuration file.
sudo nano /etc/mongod.conf
-
Inside the text editor, modify the
bindIpandsecuritysetting:
bindIp: 0.0.0.0

                            security:

                                  authorization: enabled
-
Restart MongoDB to apply changes:
sudo systemctl restart mongod
Creating an Admin User in MongoDB
After enabling authentication in MongoDB, you need to create an administrative user to manage database access.
Follow these steps:
-
Open the MongoDB shell:
mongosh
-
Switch to the
admindatabase:
use admin
-
Create a new admin user:
db.createUser({
                                user: "admin",
                                pwd: "securepassword",
                                roles: [{ role: "userAdminAnyDatabase", db: "admin" }]
                            })
-
Explanation of roles:
userAdminAnyDatabase: Grants the user permission to manage users and roles on any database.db: "admin": Specifies that the user is created in theadmindatabase.
-
Exit the MongoDB shell:
exit
- Use a strong password instead of
securepassword.- Do not expose MongoDB to the public internet without additional security measures.
- For production environments, consider using **role-based access control (RBAC)** to limit user permissions.
- If remote access is required, configure **IP restrictions** in MongoDB and AWS security groups.
MongoDB Compass is a graphical interface that allows you to visually interact with your MongoDB database. It provides an easy way to explore your collections, run queries, and manage your data.
Follow these steps to connect:
-
Download and install MongoDB Compass:
If you haven’t already, download it from the official website: MongoDB Compass Download.
-
Open MongoDB Compass.
Once installed, launch MongoDB Compass to establish a connection.
-
Enter the connection string:
mongodb://admin:securepassword@EC2_Public_IP:27017
Replace EC2_Public_IP with your actual EC2 instance’s public IP address.
-
Click Connect.
If the credentials and IP settings are correct, MongoDB Compass will establish a connection to your database.
- Never expose MongoDB to the public internet without strict firewall rules or IP whitelisting.
- Replace
securepassword with a strong, unique password.- For production environments, consider setting up **TLS encryption** and **role-based access control (RBAC)** to limit database access.
Next Steps
Now that you’re connected, you can start creating databases and collections. Refer to the official MongoDB documentation for best practices on structuring your data efficiently: